TM 9-4940-568-34
3-32. CROSS-RELIEF VALVE REPLACEMENT
THIS TASK COVERS:
a. Removal
b. Installation
INITIAL SETUP
Tools
Tool Kit, General Mechanic’s
(Item 67, Appendix F)
Materials/Parts
Hydraulic oil (Item 16, Appendix B)
Primer (Item 22, Appendix B)
Lockwasher (4) (Item 46, Appendix E)
Packing, preformed (Item 73, Appendix E)
Packing, preformed (2) (Item 75, Appendix E)
Packing, preformed (3) (Item 76, Appendix E)
Equipment Condition
FRS unloaded, (TM 9-4940-568-10).
Special Environmental Conditions
Cleanliness is extremely important when working
on hydraulic equipment. Clean all parts before
disassembly and work in a clean area.
General Safety Instructions
To avoid personal injury, always assume
hydraulic lines have pressure. Slowly crack
hydraulic lines open to allow all pressure to
escape. Always wear safety glasses.
a.
Removal
NOTE
To aid in later installation, be sure
to plug all lines as necessary,
and tag all lines and their
connection points.
Place a container to catch
hydraulic oil during removal of
hydraulic lines.
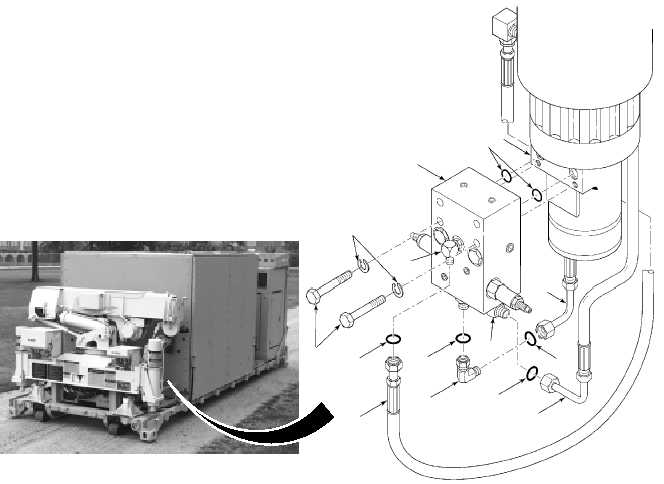
(1) Remove hose (1) and preformed
packing (2) from elbow (3). Discard
preformed packing.
(2) Remove tube (4) and preformed packing
(5) from adapter (6). Discard preformed
packing.
(3) Remove adapter (6) and preformed
packing (7) from cross-relief valve
Discard preformed packing.
(4) Remove tube (9) and preformed packing
(10) from elbow (11). Discard preformed
packing.
(5) Remove
four
screws
(12)
and
lockwashers (13) from cross-relief valve
(8). Discard lockwashers.
(6) Remove cross-relief valve (8) from
motor (14).
(7) Remove and discard two preformed
packings (15) from cross-relief valve (8)
or motor (14).
15
1
2
3
4
5
6
7
8
9
10
11
12
13
14