TM 5-3815-224-14&P
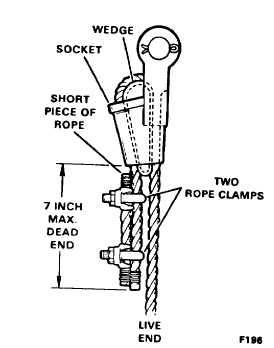
Figure 5. Installing a Rope Socket
WARNING
Wear approved leather gloves when working
with wire rope.
1.
Thread the rope through the socket and bring it
around in an easy to handle loop. Allow the rope to
assume its natural lay; do not twist the rope.
WARNING
The live end of the rope must be in a straight line
through the socket.
2.
The dead end of the rope must not extend more
than 7 inches past the end of the socket. Insert the
wedge in the rope loop and pull the wedge and rope loop
tight enough to hold the wedge in position during
handling. Final wedge positioning will take place under
full operating loads.
WARNING
Make sure the live end of the rope is not kinked
at the point where it leaves the socket.
3.
After the socket is pinned to the boom point or
hook block, apply gradually increasing loads until the
wedge is seated in the socket. Avoid any sudden shock
loads before the wedge is in its final position. When
seated properly, the wedge will just protrude beyond the
end of the socket.
4.
Cut a piece of rope and secure it to the dead end
of the rope with two clamps as shown in Figure 5.
DISMANTLING
UNREEVING
WARNING
Keep hands and clothing clear of rotating drums.
Carefully lower the boom and jib to a horizontal position
and install suitable cribbing under each section of the
boom and jib. Lower the boom and jib onto the cribbing.
Disconnect the hoist lines at the dead end and unreeve
the hook block(s) and boom point. Slowly wind the rope
onto the drum by moving the appropriate drum lever to
the raise position. A lead or brass hammer may be
useful in tapping the rope over as it is being wound on
the drum. Do not use a steel hammer or pinch bar.
These can readily cause damage to the rope. After the
boom and jib hoist lines have been unreeved from the
boom point, wind the hoist lines onto their respective
drum.
NOTE
A tension should be induced into the rope by
providing some means of braking the wire rope.
A tight winding is imperative.
CRANE BOOM. To remove the crane boom and jib,
proceed as follows:
WARNING
Do not stand under the boom or inside the boom
structure when removing pins. The boom could
fall if improperly supported and could cause
serious injury.
CAUTION
If machine is equipped with a fairlead, swing it
out of the way to fully lower the boom. See
FAIRLEAD and LAGGING Manual (TM 5-3815-223
-1 4&P).
1.
Support the jib with suitable cribbing (see Figure
3): Remove the jib suspension cables and jib strut.
2.
Remove the pins which secure the jib to the
boom, and remove the jib.
3.
Disconnect
any
electrical
cables
that
are
attached to the boom. Coil the cables and securely
fasten them to the machine cab.
4.
Relax the boom suspension and connect the guy
lines at the first insert adjacent to the tip section.
Remove the extra guy lines from the boom point.
5.
Engage the boom hoist and lift the boom just
enough to remove the bottom connecting pins from the
tip and insert.
6