
2-07
Ignition System
2-07
To check and adjust the breaker points with a feeler gauge:
To adjust the spring tension (Figure 12):
1.
Check and adjust the breaker point alignment.
1.
Disconnect the primary lead wire and the condenser lead.
2.
Loosen the nut holding the spring in position. Move the spring
2.
Rotate the distributor until the rubbing block rests on the peak of
toward the breaker arm pivot to decrease tension and in the
a cam lobe.
opposite direction to increase tension.
If the distributor is in the engine, place the rubbing block on the
3.
Tighten the lock nut: then check spring tension. Repeat the
peak of the cam by proceeding as follows:
adjustment until the specified spring tension is obtained.
Crank the engine with an auxiliary starter switch. Insert the
4.
Install the primary lead wire and the condenser lead.
correct blade of a clean feeler gauge between the breaker points
(Figure 10). Adjust the points to the correct gap and tighten the
screws.
Apply a light film of distributor cam lubricant (C4AZ19D530-A) to
the cam when new points are installed. Do not use engine oil to
lubricate the distributor cam.
Set the ignition timing If a scope or a dwell meter is used to
adjust new points, be sure the points are in proper alignment Also, set
the contact dwell to the low setting.
To check and adjust the breaker points with a scope or a dwell
meter. refer to the manufacturer's instructions.
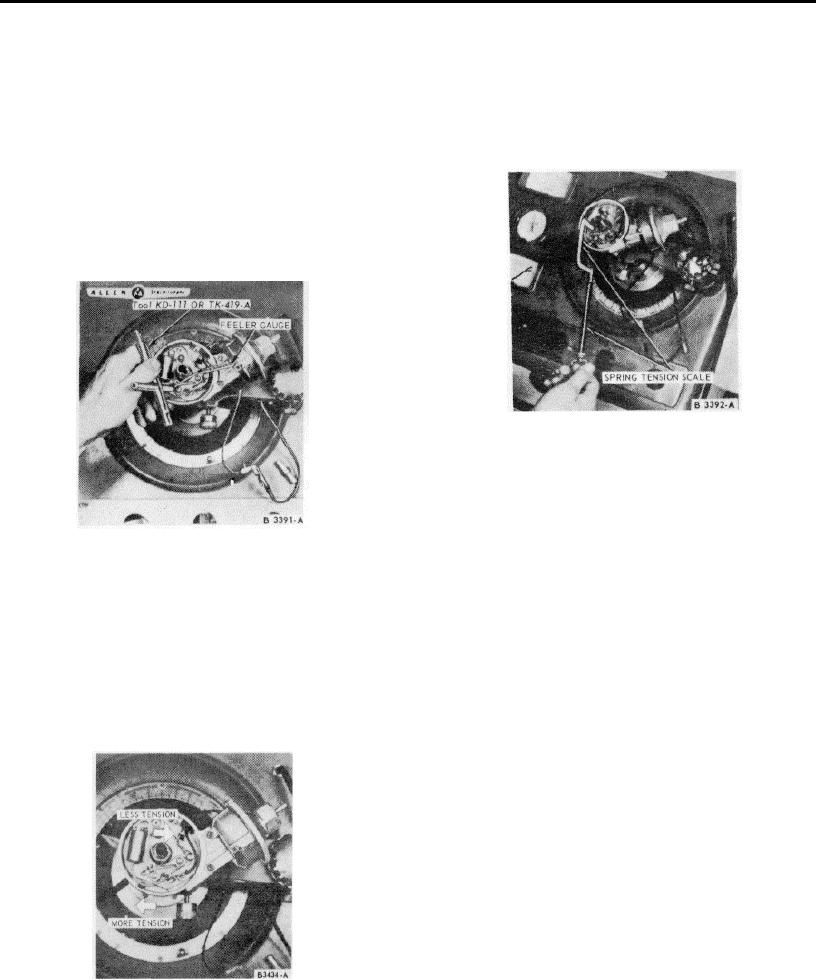
FIG. 12. Adjusting Breaker Point Spring Tension
IGNITION TIMING
Timing Mark Locations The timing marks and their locations are
illustrated in Figure 13.
For checking and adjusting the ignition timing with a scope refer
to the scope manufacturer's instructions. To check and adjust the
FIG. 10. Adjusting New Breaker Point Gap
timing light, proceed as follows:
Breaker Point Spring Tension Adjustment
Correct breaker point spring tension is essential to proper
engine operation and normal breaker point life. If the spring tension is
too great, rapid wear of the breaker arm rubbing block will result,
causing the breaker point gap to close up and retard the spark timing.
Initial Ignition Timing
If the spring tension is too weak. the breaker arm will flutter at high
1.
Clean and mark the specified timing mark with chalk or white
engine rpm resulting in an engine miss.
paint.
To check the spring tension on the breaker points, place the
2.
Disconnect the vacuum line and plug the disconnected vacuum
hooked end of the spring tension gauge over the movable breaker
line.
point. Pull the gauge at a right angle (90 degrees) to the movable arm
3.
Connect a timing light to the No. I cylinder spark plug wire.
until the breaker points just start to open (Figure I 1). If the tension is
Connect a tachometer to the engine.
not within specifications, adjust the spring tension
4.
Start the engine and reduce the idle speed to 600 rpm to be sure
that the centrifugal advance is not operating. Adjust the initial
ignition timing to specifications by rotating the distributor in the
proper direction.
5.
Check the centrifugal advance for proper operation. Start the
engine and accelerate it to approximately 2000 rpm. If the
ignition timing advances, the centrifugal advance mechanism is
functioning properly. Note the engine speed when the advance
begins and the amount of advance. Stop the engine.
6.
Unplug the vacuum line and connect it to the distributor vacuum
advance unit.
Start the engine and accelerate it to
approximately 2000 rpm. Note the engine speed when the
advance begins and the amount of advance. Advance of the
ignition timing should begin sooner and advance farther than
when checking the centrifugal advance alone. Stop the engine.
7.
If the vacuum advance is not functioning properly, remove the
distributor and check it on a distributor tester. Replace the
diaphragm unit if the vacuum portion is out of calibration.
FIG. 11. Checking Breaker Point Spring Tension