TM 5-3825-230-14&P
(3)
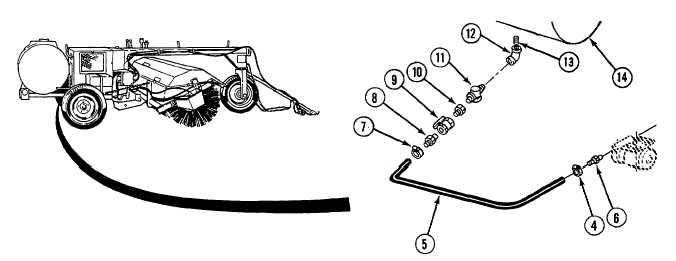
Loosen clamp (4) using a flat tip screwdriver and remove hose (5) from beaded adapter (6).
(4)
Loosen clamp (7) using a flat tip screwdriver and remove hose (5) from beaded adapter (6).
(5)
Remove beaded adapter (8) from coupling (9) using a 7/8 in. open end wrench and adjustable wrench.
(6)
Remove coupling (9), and reducer bushing (10) from line strainer (11) using a 7/8 in. open end wrench and
adjustable wrench.
(7)
Remove line strainer (11) from elbow (12).
(8)
Remove elbow (12) with nipple (13) from tank (14) using a pipe wrench.
(9)
Remove nipple (13) from elbow (12) using a pipe wrench.
b.
Installation.
WARNING
Adhesives, solvents, and sealing compounds can burn easily, can give off harmful vapors, and
are harmful to skin and clothing. To avoid injury or death, keep away from open fire and use in a
well-ventilated area. If adhesive, solvent, or sealing compound gets on skin or clothing, wash
immediately with soap and water.
(1)
Lightly apply pipe sealing compound to elbow (12), and nipple (13).
(2)
Install nipple (13) in elbow (12) using a pipe wrench.
(3)
Install nipple (13), and elbow (12) in tank (14).
(4)
Install line strainer (11) on elbow (12).
(5)
Lightly apply pipe sealing compound to coupling (9), and install coupling and reducer bushing (10) using a
7/8 in. open end wrench and adjustable wrench.
4-223