
Basic Engine
Grind the valve seats of all engines to a true 45 degree
of the valve and seat should not be lapped out. Remove
angle (Figure 24). Remove only enough stock to clean up pits
all grooves or score marks from the end of the valve stem,
and grooves or to correct the valve seat runout. After the seat
and chamfer it as necessary. Do not remove more than
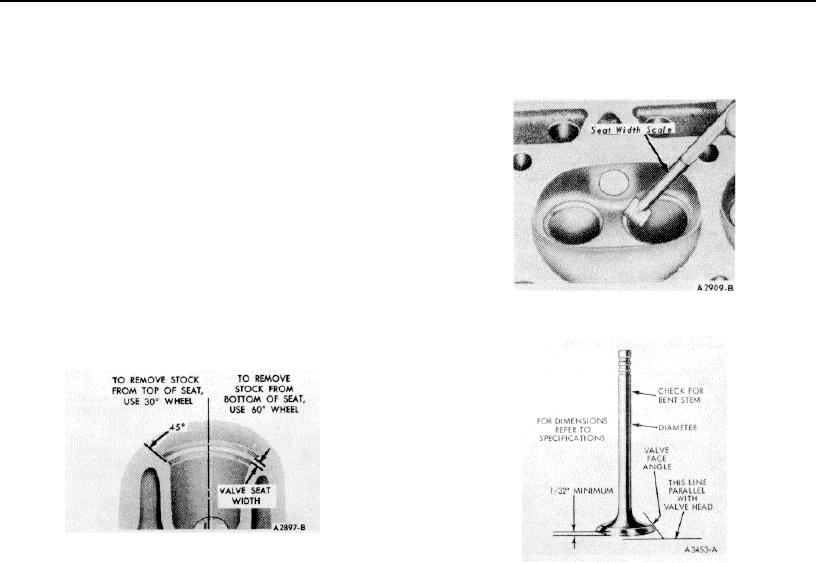
has been refaced. use a seat width scale or a machinist scale
0.010 inch from the end of the valve stem.
to measure the seat width (Figure 25). Narrow the seat, if
necessary, to bring It within specifications, and center It on the
valve face.
If the valve seat width exceeds the maximum limit, re-
move enough stock from the top edge and/or bottom edge of
the seat to reduce the width to specifications. and center.
On the valve seats of all engines, use a 60 degree angle
grinding wheel to remove stock from the bottom of the seats
(raise the seats) and use a 30 degree angle wheel to remove
stock from the top of the seats (lower the seats).
The finished valve seat should contact the approximate
center of the valve face. It is good practice to determine
where the valve seat contacts the face. To do this, coat the
seat with Prussman blue and set the valve in place Rotate the
valve with light pressure. If the blue is transferred to the
FIG 25. Checking Valve Seat Width
center of the valve face. the contact IS satisfactory. If the
blue is transferred to the top edge of the valve face. lower the
valve seat. If the blue is transferred to the bottom edge of the
valve face, raise the valve seat.
FIG 24. Refacing Valve Seat Width
VALVES
FIG 26. Critical Valve Dimensions
Minor pits. grooves. etc., may be removed. Discard valves
that are severely damaged, if the face runout cannot be
If the valve and/or valve seat has been refaced. it will be
corrected by refinishing or stem clearance exceeds
necessary to check the clearance between the rocker arm pad
specifications. Discard any excessively worn or damaged
and the valve stem with the valve train assembly installed in
valve train parts.
the engine.
SELECT FITTING VALVES
REFACING VALVES
If the valve stem to valve guide clearance exceeds the
The valve refacing operation should be closely
wear limit. ream the valve guide for the next oversize valve
coordinated with the valve seat refacing operations so that the
stem. Valves with oversize stem diameters of 0.003. 0.015
finished angles of the valve face and of the valve seat will be
and 0.030 inch are available for service. Always reface the
to specifications and provide a compression-tight fit Be sure
valve seat after the valve guide has been reamed. Refer to
that the refacer grinding wheels are properly dressed.
Reaming Valve Guides.
Under no circumstances should the faces of aluminized
CAMSHAFT REPAIR
intake valves be ground or the valves lapped in as this will
Remove light scuffs. scores or nicks from the camshaft
remove the diffused aluminum coating and reduce the valve's
machined surface with smooth oil stone.
wear and heat resistant properties. If the valve faces are worn
CRANKSHAFT
or pitted it will be necessary to install new valves and to
Dress minor scores with an oil stone. If the journals are
resurface the valve seats or. alternatively, lap the seats using
severely marred or exceed the wear limit, they should be
dummy valves. The exhaust valves may be lapped in or the
refinished to size for the next undersize bearing.
faces ground if required.
REFINISHING JOURNALS
If the valve face runout is excessive and/or to remove pits
Refinish the journals to give the proper clearance with the
and grooves, reface the valves to a true 44 degree angle.
next undersize bearing. If the journal will not clean up to
Remove only enough stock to correct the runout or to clean up
maximum undersize bearing available, replace the crankshaft.
the pits and grooves. If the edge of the valve head is less than
1/32 inch thick after grinding (Figure 26). replace the valve as
the valve will run too hot in the engine. The interference fit
1-13

